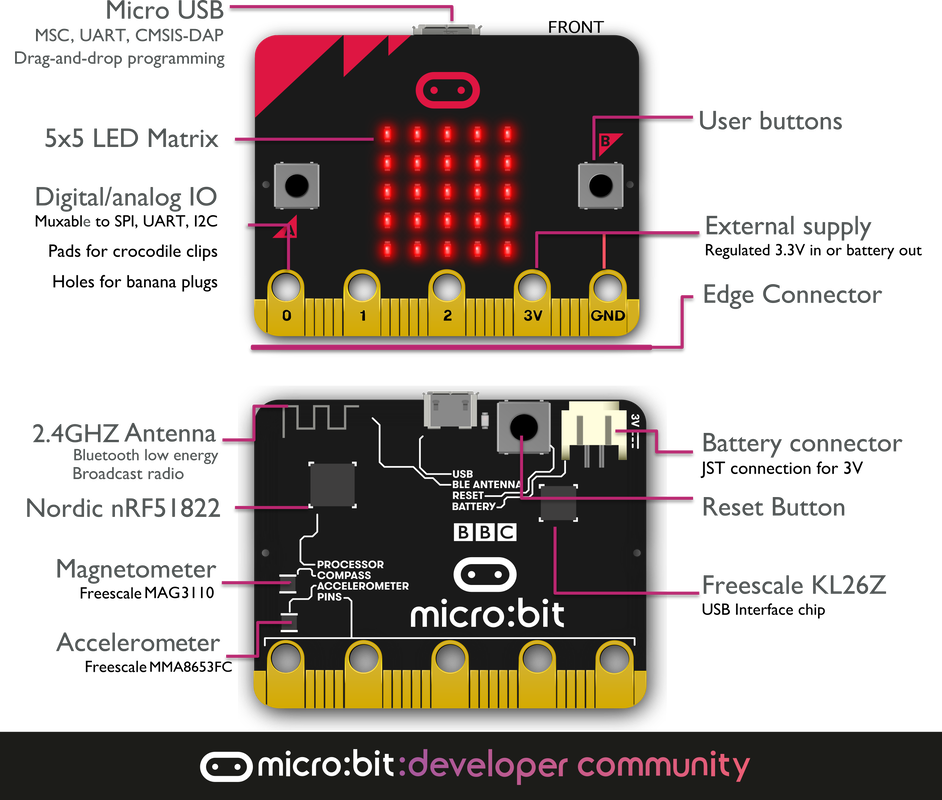
Microcontroller: Microbit controller
Activity 1 (program01): Programming a microcontroler 1. Making the built-in LED blink. Have a look at the program (code blocks) below and then click on Simulator (play button) to see the result.
Microbit Simulator
Now click on Microbit Simulator (link above), close the warning message and then click on New Project and write the title tpr2_u4_pro01. Click on Create.
- Change Language (toothed wheel at the right corner) to English.
- Notice (at the button of the page) that the name of this program is: tpr2_u4_pro01.
- Create program01 (blocks) from Microbit Simulator (pay attention to the menus):
- Delete the initial blocks (move them out of the work area)
- Your group and names from Advanced/Text/join...
- block Forever from Basic menu.
- blocks plot and unplot from LED menu.
- block pause (ms) from Basic menu.
- Check that the program works and call the teacher.
- After creating the program (code), click on Share (icon in the blue tool bar, at top of the page) and:
- Add _blink_normal to the name
- Click on Publish project to get a link and copy the link.
- Click on Download and save your program (tpr2_u4_pro01_blink_normal.hex) to Descargas.
- Upload your program and link to your Classroom/unit42/Workshop.
- Now modify the code to make 3 new programs (before getting the link, update the program name):
- This program is already created. The LED blinks normal: tpr2_u4_pro01_blink_normal
- the LED blinks faster: tpr2_u4_pro01_blink_faster (100 ms)
- the LED blinks slower: tpr2_u4_pro01_blink_slower (2000 ms)
- the LED is ON for 3 seconds and OFF for 1 second: tpr2_u4_pro01_blink_3to1

Activity 2 (program02): Programming a microcontroler 2. Making the built-in LED blink when a switch is pressed. Have a look at the program (code blocks) below and then click on Simulator (play button) to see the result. The program makes the LED blink for 3 seconds every time button A is pressed.
Now click on Edit (on the right corner of the tool)
- Notice (at the button of the page) that the name of this program is: tpr2_u4_pro02.
- Create program02 (blocks) from Microbit Simulator (pay attention to the menus):
- Delete the initial blocks (move them out of the work area)
- Your group and names from Advanced/Text/join...
- block on button from Input menu.
- Check that the program works and call the teacher.
- After creating the program (code), click on Share (icon in the blue tool bar, at top of the page) and:
- Add _motor1 to the name.
- Click on Publish project to get a link and copy the link.
- Click on Download and save your program (tpr2_u4_pro02_motor1.hex) to Descargas.
- Upload your program and link to your Classroom/unit42/Workshop.
Now modify the program so that every time button A is pressed the LED turns off for 5 seconds. Change the name for name_surname_pro02_motor2.
- Have a look at these clues:
- This program is always running.
- Initially the LED is ON.
- If button A is pressed, turn OFF the LED for 5 seconds (block while from Loops menu).
- If button A is not pressed, nothing happens
- After creating the program, click on Share and then on Publish project to get a link.
- Click on Download and save your program (tpr2_u4_pro02_motor2.hex) to Descargas.
- And upload your program and link to your Classroom/unit42/Workshop.
Activity 3 (program03): Programming a microcontroler 3. Simulating a streetlight. Have a look at the program (code blocks) below and then click on Simulator (play button) to see the result. The program tries to simulate a streetlight: LED (2,0) is the green light, LED (2,2) is the amber light and LED (2,4) is the right light.
Now click on Edit (on the right corner of the tool)
- Notice (at the button of the page) that the name of this program is: tpr2_u4_pro03.
- Create program03 (blocks) from Microbit Simulator (pay attention to the menus):
- Delete the initial blocks (move them out of the work area)
- Your group and names from Advanced/Text/join...
- Check that the program works and call the teacher.
- After creating the program (code), click on Share (icon in the blue tool bar, at top of the page) and:
- Add _sparkle1 to the name.
- Click on Publish project to get a link and copy the link.
- Click on Download and save your program (tpr2_u4_pro03_sparkle1.hex) to Descargas.
- Upload your program and link to your Classroom/unit42/Workshop.
- Now modify the program so that amber colour blinks. Change the name for name_surname_pro03_sparkle2. Have a look at these clues:
- Click on Loops and drag and drop the loop repeat 4 times to the work area.
- For LED amber (2, 2), use the loop to make:
- Turn LED on for 200 ms.
- Turn the LED off for another 200 ms.
- Repeat the sequence 10 times so the LED amber will blink for 4 seconds.
- After creating the program, click on Share and then on Publish project to get a link.
- Click on Download and save your program (tpr2_u4_pro03_sparkle2.hex) to Descargas.
- Upload your program and link to your Classroom/unit42/Workshop.

